Powered By Blogger

Tuesday, January 18, 2011

BBQ Spare Ribs

Blog #12

It's been almost a week since I've blogged.  I feel like I should be doing it more but need to find time in my schedule for it.  When I originally started  this blog, I thought one recipe a day shouldn't be hard.  Boy was I wrong.  Between 3 kids, me being a single parent (at the moment), FRG, and trying to stay on top of daily housework, a girl gets busy and gets lost in mass ciaos.  So my revised plan is to get on here at least 2 times a week.  I know that some of you are anxious to see what I will put on here next.  So I thought that this rib recipe would be perfect since I put it on Facebook and got so many comments on it. This was my first time making ribs like this.  I usually use my Grandma Margaret's recipe but I was out of the super secret BBQ sauce.  So I looked up a BBQ sauce recipe, tried it out, didn't like it, revised it, and loved it.  I think from now on, this is how I will be making my ribs.

INGREDIENTS

1 Rack of spare ribs or baby back ribs
Garlic powder, salt, and pepper to season
*You can use your favorite dry rub if you wish! Adds flavor to the beef dripping. 

Sauce
1 tablespoon paprika
1 teaspoon salt
1 teaspoon black pepper
2 teaspoons chili powder
1 teaspoon cumin
1 1/2 cups brown sugar
1 teaspoon cayenne pepper (more or less)
1/2 cup apple cider vinegar
3/4 cup ketchup
1/4 cup Worcestershire sauce
1 tablespoon lemon juice
1 half medium sweet onion, diced or 1 tbsp onion powder
1 teaspoon dry mustard
2 cloves of minced garlic or 1 tsp garlic powder
1/4 cup red wine vinegar or balsamic vinegar
3/4 cup of ribs drippings or 1/2 cup of beef broth

DIRECTIONS

1.  Preheat oven to 350 degrees F.  Place ribs in a shallow pan or baking sheet.  Season with garlic powder, salt and pepper.  Rub all of ribs, front and back.  Cover and cook for 1 hour. Once ribs are done in the oven, save dripping for BBQ sauce.
2.  In a medium sauce pan, combine all ingredients for BBQ sauce.  Mix well.  Cook over medium heat, stirring occasionally, until sauce thickens (about 30-45 mins).
3.  Once sauce is ready, turn on BBQ grill to low heat.  Place rib rack onto heated grill.  Using a sauce brush, brush BBQ sauce onto ribs, turning every 15 minutes and brushing on more sauce or until nicely browned and glazed.  Cook on grill for 1 hour.  (Should turn ribs and brush sauce on each side twice)
4.  Slice and serve with some mashed potatoes and corn on the cob. 


Wednesday, January 12, 2011

Orange Stir-fry Rice

So, tonight I decided to experiment with dinner.  I had chicken pulled out and I knew that I wanted to use the Con Culantro Y Achiote seasoning (Coriander & Annatto) in my rice.  For those of you wondering what the hell Annatto is, don't worry I had to look it up myself.  Annatto is a derivative of the achiote trees, used to produce a yellow to orange food coloring and also as a flavoring. Its scent is described as "slightly peppery with a hint of nutmeg" and flavor as "slightly sweet and peppery". 


My end product turned out to be a cross between paella and fried rice.  We got introduced to this seasoning by one of Gary's friends, co-worker, chief brother who worked with him at TPU in Great Lakes.  His wife is from Guam and he said that this is how they always make their rice.  I thought that it was so delicious.  So for today's entry, I decided to post this recipe.  I decided it to call it I don't have my friends from Guam so this might already be a Guamanian dish.  Please let me know if it is.  I added a picture of the seasoning so you know what to look for when and if you decide to buy it.  We have found it anywhere Goya products are sold - the commissary, Super WalMart, various Asian markets.  So for now, I'm calling this recipe Orange Stir-fry Rice.  If anyone comes up with a better name or if it already has a name, please share!


INGREDIENTS


5 boneless, skinless chicken breasts or thighs, cubed
2 tablespoons of oil
2 packets of Goya Con Culantro Y Achiote seasoning (I believe 8 comes in a pack)
2 cups of rice
2 cups of water
1 1 lb. bag of frozen stir-fry peppers with onion
Garlic powder, salt, pepper to season


DIRECTIONS


1.  Cook two cups of rice in rice cooker with 1 packet of seasoning and water.  Make sure to stir up seasoning and water before adding your water to your rice.
2.  Put oil into a frying pan with chicken.  Season with seasoning, garlic powder, salt, and pepper.  Once, chicken is cooked, add your stir-fry peppers.  Remove from heat after chicken is cooked until rice is done.
3.  Once rice is done, add rice to chicken and peppers.  Stir until it is completely mixed together.


Tuesday, January 11, 2011

Broccoli Cole Slaw/ Saimin Salad

Blog # 10


My island people know this recipe as Saimin Salad.  Paula Deen calls it Broccoli Cole Slaw.  My friend Melissa Weaver, who made it at one of their BBQ's in 2008, told me where I could find this great recipe.  I was so happy to have some ( I probably ate half of the bowl), especially since the last time I had it was in 2000 with my Uncle Ron Pritchard (R.I.P) at DDW (Don't Drink the Water) at the Pago Plaza in American Samoa.  I love it because you don't have to cut up cabbage all day long.  It is so much faster with this recipe.  It tastes exactly the same, just less time consuming.  I added a picture of what the packaging looks like that is used in the recipe.


INGREDIENTS


Salad:
1 bags (3-ounce) Ramen Noodle Soup
3/4 stick butter
1/4 cup slivered almonds
1 bags (12-ounce) bags broccoli cole slaw (in the bagged salad section of the grocery store) or regular cole slaw mix
1/4 cup sunflower seeds
Chopped green onions, for garnish

Dressing Mix:

3/4 cup canola oil

1/4 cup brown or white sugar

1/4 cup apple cidar vinegar

1 ramen noodle seasoning packet

1 tsp sesame seed oil

DIRECTIONS

1.  Put the ramen noodles in a bag and crush them with a rolling pin.
2.  In a large skillet, melt butter over low/medium heat. Add the crushed noodles and slivered almonds to the skillet and saute, stirring occasionally (keep temperature at low/medium heat). 
3.  Whisk together all the dressing ingredients in a small bowl. 
4.  Place the shredded broccoli/coleslaw into bowl and toss with the noodles, almonds, and sunflower seeds. Pour dressing over salad just to coat. Toss right before eating. Garnish with chopped onions.


Stuffed Chicken Rolls

Blog # 9

This one is from the side of a Stove Top Stuffing box.  I wish my kids would eat stuffing so I could make it once a week.  I'm a huge fan of this recipe.  It is super delicious.  And other than the pounding that you have to do in the recipe, it is pretty easy to make.

INGREDIENTS

1 6 oz. box of Stove Top Stuffing mix
2 eggs, lightly beaten
6 small boneless, skinless chicken breast halves, pounded to 1/4-inch thickness
1 can condensed cream of chicken soup
1/2 cup milk
1 teaspoon paprika

DIRECTIONS

1.  Combine stuffing mix and 1 cup of water in a large bowl.  Let stand for 5 minutes.  Stir in eggs.  Spread stuffing mixture evenly over chicken breasts, to within 1/2-inch of the outer edges.  Roll up chicken from one short end to enclose stuffing mixture.
2.  Place chicken rolls, seam side down, in 13 x 9-inch baking dish.  Mix soup and milk; pour over chicken.  Sprinkle with paprika.
3.  Bake at 400 degrees F for 30 minutes or until chicken is cooked through.

*  To pound chicken, I found it easy to put chicken in a Ziploc bag one at a time.  It keeps the chicken juice from getting all over your kitchen and is easier with clean up too.  If you don't have a mallet, use a can of veggie or whatever you have in your pantry.  A rolling pin works too.  Roll it across the chicken, putting your weight on it until you get the desired thickness.

* If you have leftover stuffing, put it on top of you chicken before you pour on the soup and paprika.

Muddy Buddies

Blog # 8

This recipe you can find on any box of Chex cereal. It's great for any occasion - snack, potluck, dessert.  It's also a great way use your WIC checks (if you are on it), especially if your kids and you are only into sweet cereals.  I'm sure most of you have this recipe in your recipe box.  It's super easy to make and only takes about 15 minutes to make.

INGREDIENTS

9 cups of Rice Chex, Corn Chex, Chocolate Chex, or Honey Nut Chex
1 cup semisweet chocolate chips
1/2 cup peanut butter
1/4 cup butter or margarine
1 teaspoon vanilla
1 1/2 cups powdered sugar

DIRECTIONS

1.  In a large bowl, measure out cereal.  Set aside.
2. In a 1-quart microwavable bowl, microwave chocolate chips, peanut butter, and butter uncovered on High for 1 minute; stir.  Microwave about 30 seconds longer or until the mixture can be stirred smooth.  Stir vanilla.  Pour mixture over cereal, stirring until evenly coated.  Pour in 2-gallon resealable food storage plastic bag.
3.  Add powdered sugar.  Seal bag; shake until well coated.  Spread on waxed paper to cool.  Store in airtight container in refrigerator.

Saturday, January 8, 2011

Panko Breaded Deep Fried Shrimp

Blog #7

My husband came home for the holidays and brought me home 10 pounds of jumbo tiger prawns from Mississippi.  So this is what we decided to make with about 2 pounds of them one night for dinner.  It was very tasty and had really good flavor. 

INGREDIENTS

1 pound medium shrimp, peeled (tails left on) and deveined
1/2 teaspoon salt
1/2 teaspoon ground black pepper
1/2 teaspoon garlic powder
1 cup all-purpose flour
1 teaspoon paprika
2 eggs, beaten
1 cup panko crumbs
1 quart vegetable oil for frying

DIRECTIONS

1.  Place the shrimp in a medium bowl and season with salt, pepper, and garlic powder and mix.  In a small bowl, stir together the flour and paprika.  Place eggs into a separate bowl and finally place the panko crumbs into another bowl.
2.  Heat the oil in a deep fryer or skillet to 375 degrees F.  Dip each shrimp into the flour mixture, then into the egg, and finally into the panko crumbs to coat.  Fry a few at a time until golden brown.  This should take no longer than 5-7 minutes (depending on the size of your shrimp).  Remove and drain on paper towels before serving.

Mochiko Chicken

Blog #6

Ever since I lived in Hawai'i, Mochiko Chicken as been a favorite of mine.  It is so easy to make and my children love it.  It is a great dish for lunch, dinner, or for a party platter.  The preparation time is close to nothing, but it does need to refrigerate for at least 8 hours.  I usually make it the day before.

INGREDIENTS

5 pounds of boneless skinless chicken breast, cut in strips
1 cup of white rice flour (mochiko flour)
1/3 cup cornstarch
1 cup soy sauce
1/2 tablespoon salt
3/4 cup of white sugar
1 cup chopped green onion
6 cloves minced garlic
1 teaspoon cayenne pepper
5 eggs
oil for frying

DIRECTIONS

1.  In a large bowl, combine flour, cornstarch, soy sauce, salt, sugar, green onions, garlic, cayenne pepper, and eggs. Mix well.  Add chicken and marinate for 8-24 hours, refrigerated.
2.  Remove from refrigerator, deep fry and serve.

Thursday, January 6, 2011

Gingered Steak

Blog #5

This recipe has become a favorite of mine and my family.  I got this recipe from http://www.allrecipes.com/ about 2 years ago and have been making it since then at least once a month.  I've also used the marinade for steak kabobs cutting up onions, bell peppers, zucchini, and using grape or cherry tomatoes and whole button mushrooms and putting them on skewers. I always serve it with some white sticky rice. 

INGREDIENTS

1/2 cup of soy sauce
2 tablespoons of brown sugar
2 tablespoons of Worcestershire sauce
1 tablespoon of lemon juice
1/2 teaspoon of minced ginger
1 clove of minced garlic (1/2 teaspoon from the jar)
1 pound of skirt or flank steak

DIRECTIONS

1.  In a bowl, combine soy sauce, brown sugar, Worcestershire sauce, lemon juice, ginger, and garlic.  Pour into a resealable container or Ziploc bag; add steak.  Marinade for 4-8 hours.
2. Grill steak on medium heat for 5-7 minutes on each side. This will bring your steak to about medium well to well done depending on the thickness of the steak.
3.  Slice and serve with your favorite vegetable(s) and rice.

Fish Cake Dip

Blog #4

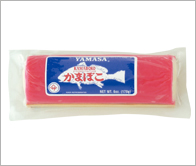
I'm sure some of you are thinking to yourselves "What in the world?"  But don't knock it til you try it!  The best part about this recipe, is there is only 4 ingredients.  SUPER EASY! Fish cake, also known as kamaboko, is usually in your bowl of saimin.  You know the Kim Chee bowls or the Hot bowls that you can get just about anywhere in the world in any grocery store.  Fish cake is usually circular, a half moon, or rectanglar shape with a white center and pink around it.  If you've ever had a saimin from L & L's, then you should know what it is.  I added this picture to show all of you what a red kamaboko or fish cake looks like whole.
You can find it pretty much anywhere in Hawai'i and at any Asian market in the rest of the US.  Trust me, I found some in Illinois and there is all of 2 Asian markets there.  But what is kamaboko?  Kamaboko is a type of cured surimi, a Japanese processed seafood product, in which various white fish are pureed, formed into distinctive loaves, and then steamed until fully cooked and firm. Is it fishy?  Absolutely not! Just make sure you give this dip a try.  And if you are not comfortable calling it "fish cake dip"  then call it "kamaboko dip" or just tell everyone it's "crab dip" to save yourself the trouble of having to explain it over and over and over again what the hell it is and it will look like crab since it is pink and white just like imitation crab.

I got this recipe from Tasanee's dad's sister's friend many years ago.  I can't remember her name to save my life but she was a beautiful local girl who lived in Ewa Beach.  Her husband was this big macho man who worked at the Halawa prison.  They were always very nice and I enjoyed going to their house and trying new food.

INGREDIENTS

1 red fish cake loaf
5-7 strings of green onion
2-4 tablespoons of mayonnaise
1 box of Ritz crackers

DIRECTIONS

1.  Dice up fish cake.  It helps to use a food processor (so much easier). Place in a medium size mixing bowl.
2.  Finely cut up green onion and place in mixing bowl with fish cake.
3.  Add 2 tablespoon of mayo and stir.  You want the same consistency as tuna salad or egg salad.  So add another tablespoon or 2 of mayo if needed.
4.  Chill and serve with ritz crackers.

I hope that you all will give it a try.  My aunt and cousin told me once that they didn't like fish cake and I told them that the fish cake dip I make will definitely make them like fish cake.  And it did.  I mean they won't eat it in the bowl of saimin but they sure can eat some fish cake dip.  Make sure to leave comments on this one for me.  I really want to hear what you all have to say about it when and if you try it, whether it is a positive or negative comment.

Tuesday, January 4, 2011

Fresh Squeezed Lemonade

Blog #3

I'm sure some if not most of you already make lemonade, but there are a few that would love to make some delicious thirst quenching lemonade.  I have been using this recipe for years and this one is all my own.  Sure, it is the same simple ingredients and I'm sure one of you makes it the exact way I do.  And if you do, then you know we make some good lemonade. ;) It's a little tart and not too sweet. It's the perfect mix of sweet and sour.   This recipe will give you 1 gallon size pitcher full so make sure you have it available.  I wanted to give a shout out to my friend Christina Schoenhofen for giving me these huge lemons that she got from her friends Molly and Phil Lovell. So when life gives you lemons, make some of Cheryl's lemonade!!!!!

INGREDIENTS:

2 cups of freshly squeezed lemon juice (around 10-15 small lemons)
1-2 cups of sugar
water to fill the rest of the 1 gallon size pitcher

DIRECTIONS:

1.  Take your 2 cups of lemon juice and pour into 1 gallon size pitcher.  Fill the pitcher with water til 1 inch from the top.  You don't want it to overflow once you put the sugar in.

2.  Take a cup of sugar or sugar substitute (I don't use it.) and pour into pitcher.  Mix well and taste.  If it's too sour for you then add more sugar in 1/4 cup increments until it reaches your liking.  (I'm sure you will end up with 2 cups of sugar in the pitcher.) 

3.  Now get yourself a glass.  Put some ice in there.  Fill to the top with your lemonade.  Enjoy!

Monday, January 3, 2011

Deep Fried Mushrooms

Blog #2

This recipe I found on http://www.allrecipes.com/.  I use to use this packet from the commissary where you just had to add water, but for some reason, they stopped selling it there and haven't found it anywhere else.

INGREDIENTS:

1 cup all-purpose flour
1 teaspoon garlic salt
1 teaspoon black pepper
1 egg
1 cup of water
1 pound of mushrooms
2 cups of oil for frying

DIRECTIONS:

1.  In a medium bowl, stir together flour, water, egg, garlic salt, and pepper until smooth.  Batter will seem a little soupy, but that's how it should be.

2.  Heat oil in a large skillet or pot over medium-high heat.  Even better, if you own a deep fryer! Test to see if oil is hot by frying a drop of batter.  If it sizzles and floats to the top, the oil is ready.

3.  Dip mushrooms into the batter and then place in the hot oil.  Fry a few at a time so they are not crowded.  Cook until golden brown, about 3-5 minutes.  Remove from oil with a slotted spoon or tongs and drain on paper towels.

*You can serve them with a side of ranch dipping sauce or dress it up by mixing the mushrooms in your favorite sauce straight out of the fryer.  Personally, I like to mix them in Buffalo Wild Wings Mango Habanero sauce and serve them with a side of ranch, an idea I got from Robert Bowles (my cousin's husband) and now an all-time favorite of my uncle Sam Gadalla.

*Make sure you cook them right before chow time.  These mushrooms don't last long and just like all things fried, the "crunchy" disappears after it sits out too long!